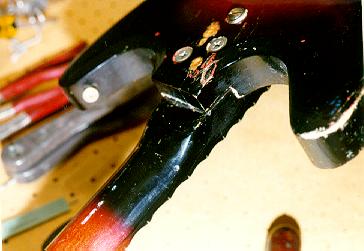
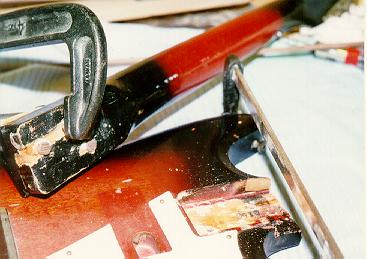
The main reason for bringing this guitar back into the shop is to repair this old damage to the neck heel. You can see the rather slap-dash job my brother and I did reparing it originally 20 years ago. The main problem is that the screw holes are stripping out and the neck is pulling up, raising the action and playing hell with the intonation.
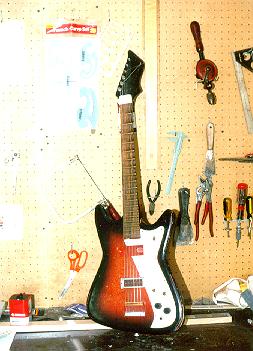
As long as I'm going to have it on the bench, I'm going to take care of one or two other issues:

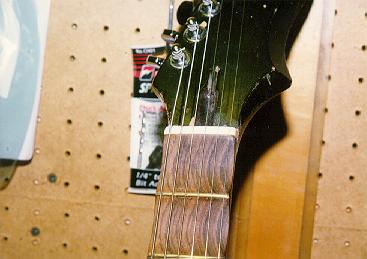
These tuning machines are pathetic. They have yards of backlash and are the most difficult things to keep in tune I've ever seen. Dig the wad of clay packed around one of the gears to keep it from slipping and buzzing! I happen to have a set of Ping tuners (marketed by Ovation) laying around, so even though putting $30 tuners on a $3 guitar might not seem cost effective, I'm fond of this old bird so I'm going to do it. While I'm up at the top of the neck...

Look at that nut! Some horrible piece of crap from some other horrible old guitar. Dig the shims; both the one under the length and the ones under individual strings are pieces of business card. Time to learn how to cut a new one, using the set of nut files I bought last year from Stewart-MacDonald. Lastly...
We'll put some attention into that fingerboard. The original position dots are history; ripped out long ago during the initial scalloping. On the Wolfson guitar I experimented with a technique of inlaying thick position dots into a maple fingerboard using short lengths of walnut dowel. I'm going to try the same technique here, using oak. I need to see how successfully lighter woods work inlayed into darker woods before I attempt the same thing on the Les Paul.
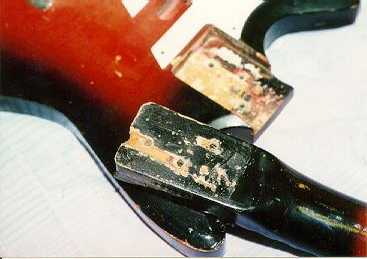
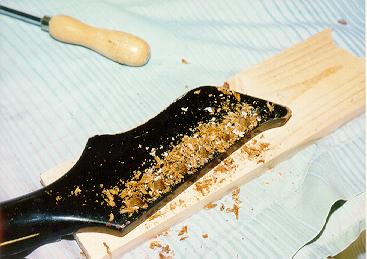
The first step is to drill out the existing, damaged holes with a 3/8 Forstner-style bit. I then fill the enlarged holes with 3/8 inch birch dowel, glued and clamped firmly in place.
Once dry, I saw, rasp and sand the dowels flush. For aesthetic reasons more than anything else I fill the splintered-out areas with wood putty. Once everything is dry and solid, I fit the repaired neck to the pocket in the body, relocate the positions of the screw holes and drill them out to the appropriate size and depth.
The first major task is to drill out the tuning machine holes for the larger diameter posts of the replacement machines:
I've seen handy dandy tools that people have made to ensure that the enlarge holes are perfectly in line with the originals. I don't have the luxury of being able to fabricate such a beast, so I settle on a round-nose drill bit that (I hope) will more or less auto-center itself in the existing hole as it begins to cut.

Having now put tuners on a few instruments, I can say that the most niggling problem is to get them to line up like good little soldiers. My trick is to lay a metal straight edge along the backof the row of machines (opposite the keys) pushed up against the flat sides. When they're all squared, mark the position of the screw holes with a pencil. Using a hand drill to actually drill the holes might be easier than a power drill. I find that the slow starting speed of a hand drill is less likely to cause the bit to wander.
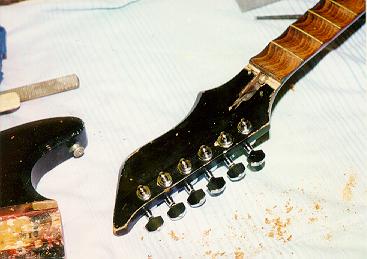
Not perfect, but a major improvement!
Next, I cut the new nut to shape. I found a nice piece of old, yellowed bone at a vintage guitar show. I use a razor saw to cut it to the correct length. I then face it against the old nut and draw the rough profile on with pencil. I use files to shape the arch across the top. With the nut held in place on the guitar with a piece of double-sided tape, I shape the angle with a file held paralell to the face of the peg head.

Jumping ahead a bit, I'll describe the finishing of the nut: The string locations are also taken off the original nut. I begin each string notch by cutting a narrow groove with a razor saw, which I then enlarge with appropriate sized nut files. The trick I had learned for determining the proper depth of each cut is to hold the string down at the first fret. Then use a feeler gauge to determine the height of the string at the second fret. Then hold the string down at the second fret and use the same thickness gauge under the first fret. You then cut the notch until the gauge indicates that the action at the first fret is the same as it was at the second fret.
After cutting the string notches I then final shape the crown of the nut. Remember that it's initial shape was based on the original nut. Well, the original was too tall in places and the strings were cut way too deep. I carefully file down the top of the nut until I am just grazing over the tops of the strings in their slots. I then pop the strings out of the slots and remove a little extra, so that the tops of the strings are just above the bone. The final task is to polish it up with some 600 grit sandpaper. Voila!